MB
data
mins
texts
a month

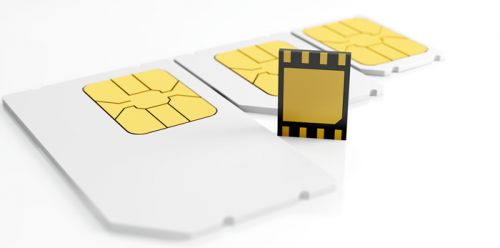
The future of SIM cards isn’t physical objects that you have to put in your phone, rather it’s an eSIM. That’s the name for an embedded SIM card, and it’s a future that’s already beginning, as many smartphones and other devices already have an eSIM.
Below we’ll explain exactly how to activate an eSIM on Three, along with what phones support eSIM, and answers to any questions you’re likely to have about them.
So whether you already have a device with a Three eSIM or you hope to get one in future, here’s what you need to know about setting them up.
The process for activating a Three eSIM on a new iPhone bought from Three is very simple – in fact the network now offers something called ‘seamless eSIM activation’. Just make sure Wi-Fi is turned on, then follow the simple steps that should appear on your phone’s screen.
If you didn’t buy your iPhone from Three then you may not be able to use seamless activation, in which case you can go to Settings > Mobile Service > Convert to eSIM, to convert a physical SIM card to an eSIM.
Or if you don’t already have a Three physical SIM, or if Three has sent you a QR code, follow these steps:
Make sure Wi-Fi is turned on, then open the settings menu, select Mobile Service > Add eSIM > Use QR Code, and then scan the QR code that Three will have emailed you.
Next, type in the confirmation code that Three will have sent in a separate email, and your eSIM will then activate. It should usually do so instantly, but can take up to seven hours.
If for any reason your eSIM QR code won’t scan, there is an alternate way to activate your eSIM. With your iPhone connected to Wi-Fi, go to Settings > Mobile Service > Add eSIM > Use QR Code > Scan QR Code. Then tap 'Enter Details Manually' and fill in the relevant fields with the information found in the eSIM emails you received from Three.
Then tap ‘Next’, followed by ‘Continue’, and wait for the eSIM to activate.
If you have a Google Pixel 11, a Google Pixel 11 Pro, a Google Pixel 11 Pro XL, or a Google Pixel 11 Pro Fold bought new from Three then you can use ‘seamless eSIM activation’ – meaning just turn the device on, activate Wi-Fi, and follow the on-screen steps.
If however you need to convert a physical SIM card to an eSIM, then instead go to Settings > Network and Internet > SIMs, then select the SIM you want to convert, and tap ‘Convert to eSIM’.
For other Android devices you can instead follow the steps below.
On other Android phones the process to activate a Three eSIM is currently slightly less seamless, but still fairly simple. All you need to do is ensure Wi-Fi is enabled, then do something along the lines of the following (though the exact names of menus and options may vary a bit depending on your Android phone):
Open the settings menu, then head to ‘Connections’ (or on some phones ‘Network and Internet’), then head to either ‘SIM Card Manager’ or ‘Mobile Network’ (depending on your phone), and then select either ‘Add Mobile Plan’ or ‘Download a SIM Instead’, and then scan the QR code and enter the confirmation code that Three will have sent you.
If for whatever reason you can’t scan your eSIM QR code then, with your phone connected to Wi-Fi, do the following:
If you’re using a Pixel phone, go to Settings > Network and Internet > Mobile Network > Download a SIM instead. Then tap ‘Next’, followed by ‘Need Help’, and then ‘Enter it manually’. Then type in the activation code Three will have emailed to you alongside the QR code, and then tap ‘Continue’. Next tap ‘Activate’, and then enter the confirmation code that Three will have also emailed you, and then tap ‘Continue’, followed by ‘Done’.
If you’re using a Samsung phone then you should open the settings app, and then tap ‘Connections’, followed by ‘SIM Manager’, and then select ‘Add Mobile Plan’ or ‘Add eSIM’, and tap ‘Scan QR code’.
Then you should select ‘Enter activation code’, and type in the activation code found in the QR code email that Three sent you. With that done, tap ‘Done’, and then enter the confirmation code that Three sent in a separate email, then tap ‘Confirm’.
A message should come up saying ‘Adding plan to your phone’, so just wait for this process to complete, after which you’ll be returned to the settings screen and should see that your eSIM is active.
Again, the exact process and wording may vary depending on your handset and software version, but it should be something along these lines.
Numerous brands now support eSIMs in at least some handsets, but Apple, Google, and Samsung all have a large number of phones with eSIMs.
You’ll find an eSIM inside every iPhone from the iPhone XR onwards for example, including the iPhone 17 range, along with many Samsung phones – such as the Samsung Galaxy S26 range, and in every Google Pixel phone from the Pixel 3 onwards, including the Google Pixel 11.
You’ll also find one in some devices from other companies, such as select Sony, OnePlus, Xiaomi, Huawei, Motorola, Fairphone, Nokia, Microsoft, and Oppo handsets. Some smartwatches also include them, such as the Apple Watch 11.
Note however that in some cases there may be multiple models of the devices – some with and some without eSIMs.
An eSIM is an embedded SIM card. That means it’s built into your device, and on Three it’s typically activated either through a ‘seamless’ process or with a QR code. If you ever change network then rather than changing SIM card you would simply change which network your eSIM is registered to.
That depends on your device, but in general yes, as most current phones with an eSIM also have a standard SIM card. That means you can potentially have two different plans or networks on your phone at once, or simply choose whether you’d rather use the eSIM or physical SIM.
If for any reason you need to remove an eSIM from your device, it’s easy to do. The exact wording will depend on your phone, but on an iPhone for example, just go to Settings > Mobile Service, tap the eSIM you want to remove, then tap ‘Delete eSIM’.
On a Pixel you’d similarly go Settings > Network and Internet > SIMs, then tap the eSIM you want to remove, and tap ‘Erase eSIM’.
And on a Samsung phone the process would be Settings > Connections > SIM manager, then tap the eSIM you want to delete, and tap ‘Remove’.
QR stands for ‘quick response’ and a QR code is a lot like a barcode – it contains information that a computer can read by scanning it. In the case of an eSIM QR code, it has the information required for Three to activate an eSIM on the phone that scans it.
If you lose your eSIM QR code before setting it up, or delete your eSIM from your device, you can simply request a new eSIM QR code from Three. This can be done either online or by calling Three – on 333 from your Three phone, or 0333 338 1001 from any other phone.
If your new device is an Android phone and it has an eSIM card then simply request a new eSIM from Three – you’ll be sent a QR code and can follow the above instructions again on your new device.
The exception to this at the time of writing is if you have a Pixel 11 series phone and you’re transferring from another Pixel 11 series phone, in which case on the new phone you can go to Settings > Network and Internet > SIMs > Add eSIM, and tap ‘Ok’. Then tap ‘Transfer a SIM from another device’, followed by ‘Android device’, and scan the QR code that appears with your old Pixel.
Then tap ‘Ok’ on this device and ‘Transfer’ on your new device, and enter your PIN on your old device to complete the process. While this only works on the latest Pixel phones currently, it’s likely that other handsets will soon start allowing eSIM transfers this way too.
Or if both your new and old phones are iPhones then you can transfer the eSIM across by going on your new iPhone to Settings > Mobile Service > Set Up Mobile Service, and then selecting the number you want to transfer or – if it’s not listed – choosing ‘Transfer from Nearby iPhone’, and following the instructions.
If your new phone only has a physical SIM card slot then you can request a physical SIM card and pop it in, just like you’ll have done with previous phones.